Monday, February 13, 2012

VALENTINE ROSES

Tomato and cherry tomato roses, strawberry roses, cucumber leaves and a carrot garnish, topped over a salad of cherry tomatoes, strawberries and clementine supremes. For this year's Valentines Day, I created this meant-to-be-desert dish after being inspired by some online food art. I call it, "Bouquet" - Happy Valentines Day!

Above: Bouquet! Freshly delivered to you!

The salad underneath was just a mix of strawberries cut to be heart shaped, mixed with cherry tomatoes and clementines cut supreme-style. A little bit of mashed up strawberry and squeezed clementine juice was added, and then topped with the fruit roses and vegetable leaves. All in all, this took longer than I thought - this was my first time making fruit roses! Here are some preparation pics:

Above: In the process of cutting some fruit roses!
(Notice the tomato carnage behind?)

Above: My super messy desk space used for making the 'Bouquet'.

And lastly, another shot of the 'Bouquet' - Enjoy!

Above: Happy Valentines Day!

After it was all done and made, I removed the roses and ate about half the salad - not bad for an improv dish. I'll be saving the other half for the actual Valentines Day tomorrow. :)

Sunday, February 12, 2012

BRIGHT LIGHTS

(Side note: I was actually planning to update yesterday, but the original RGBeta demo video was somehow corrupted and wouldn't upload past 50%. So here's the post today!)

Halfway through soldering on the LED strip wires, I realized that I could have made the job simpler for myself if I had created just 4 rails (common anode, red, green blue) for each LED strip to attach to, instead of making separate individual connectors for each LED strip that would attach to the actual electronics board. Plus, it would have also been a much cleaner and simpler design! On the upside, the lights all worked, and now each strip could be controlled!

(Running off default Arduino PWM frequency - might change later)
Above: RGBeta lights demo!
Oh, MITERS people - listen to how awesome and random they are.

Above: TANGLE OF WIRES, OMG. ><

Plan: I'm going to hot glue all the solder joints, tape the connection wires together so they're not in that sprawling mess like in the photo above, and construct the box! Unfortunately, I have no access to a laser printer anytime soon, so there's 2 options: (1) cut and shape a box by hand from scrap wood (I'll have to make a new CAD drawing for this), or (2) use an old scanner as a base. When I had finished the soldering and was contemplating how to make the box, Steve from MITERS offered up an old scanner that was lying around. Though it's a bit too large to fit inside my backpack, the depth of the scanner looked perfect for the distance between the LEDs and the diffuser - I'll keep it as a Plan B at least!

Also, since this was the most soldering I've done in one sitting yet, I learned to use a new trick! I bundled up each colored wire together and soldered the ends all in one round - I should have thought of this earlier, haha. In fact, the veteran solder-ers all replied they knew of this trick already! I guess that's what experience is all about...

Above: Group soldering in process.

On another note, the school semester started this week! I have some things I want to build and do during this time, so hopefully my time won't be completely eaten by my schedule!

Tuesday, February 7, 2012

MAGICAL GIRLS

I was commissioned last semester to design a pair of magical girls - among the requirements, one had to have lots of frills and bows, and the other lots of elegance. And just recently, I met with my commissioner to give her the final products. I hope I did them justice! I present Eugene and Clotho, magical girls whose character and design belong wholly and solely to my commissioner. PLEASE DO NOT USE WITHOUT PERMISSION! :)

Above: Magical girl Eugene! Frills and bows galore!

Above: Magical girl Clotho! Elegance with a bit of toga-flair!

I've also added them to my DAportfolio, so if you have a chance and are curious, check out my 'my daportfolio' link to the side!

ON A SIDE NOTE - CLASSES BEGIN TOMORROW! I'm not sure whether to feel excited or sad or worried, seeing as how this is my senior year.

Sunday, February 5, 2012

SOLIDWORKS + RGBETA

Quick update! Ever since I downloaded Solidworks yesterday, I've discovered that Solidworks is so much fuuun!  I turned my messy layer sketch of RGBeta's shell...

Above: Messy thought doodles!

...into something that looks much neater and makes more sense!

Above: It looks like a box! xD

Above: A semi-transparent view of RGBeta's box - the completely transparent view was
much too messy for me to get a good angle on.

It measures 13x12 in, scaled to fit in my backpack, opens up in both portrait and landscape mode, has a hidden paper storage section, and has a small pencil case to the bottom right! (Box is suited for right handers!) The upper right corner stores all the electrical components that drives the LED strips that will be located in the top box. The 3 open grooves up top are meant to hold the sliding potentiometers that control the RGB values of the LEDs. Now the only things that are missing from this model of the frame are the hinges and tiny locks (that keep everything from falling apart)! But fortunately, there's only a small amount of adjustment that will need to happen to this Solidworks model when I secure the ones I want, and the hinges won't affect the overall structure or size much. Now, how to find access to a laser printer..............

In the meantime, I'll be playing around with splines, haha.

Saturday, February 4, 2012

BELATED BDAY + SWEETS

Last Sunday, I turned one year older!

The Saturday before my actual birth date, Vivian ([VENERABILITY]), Jocelyn and some other friends took me out to Karaoke and then presented me with this sumptuous looking cookie cake at midnight:

Above: Karaoke cookie birthday cake!

I sang a few songs with them and then retreated back to MITERS with Charles ([etotheipiplusone]) where I got in some flying practice with Tinycopter, Charles' little quadrotor (Me flying [YT LINK]: Him and Shane flying [BLOG LINK]). Then, on the day of, Julia, Chris and Emily (still name-throwing!) surprised me with another cake at MITERS. And yes, Charles had to blowtorch the candles...

Above: Charles blowtorching my birthday candles.

Above: Before and after shots of the MITERS cake! It survived somehow.

Above: What I did with the ribbon around the bday cake -
Drive a screw and attach a nut at the junction point and create an impromptu ribbon!
ALSO, BRANDI GOT ME THAT CUTE FEDORA! :D

Above: Bday present from Jocelyn! I can draw on my mug now?! :D

All in all, my friends definitely made my birthday into something special. Thank you all! <3

Just an update on RGBeta, my adapter arrived last week! Though, I accidentally hooked up the 12V adapter to the 5V rail and killed my first Arduino. :( BUT! On the upside, I installed SOLIDWORKS today, so I'm planning on updating again pretty soon with the CAD designs!

ALSO! I never realized CANDY LEGO's existed?! Charles got me some candies, and I was super amused with the candy Lego's inside! I had so much fun with them, I ended up not wanting to eat them, haha. Maybe I should actually buy a real set again - building with Lego's brings back lots of memories. :)

Above: Random candy LEGO structure!

Above: Candy Lego heart! There weren't enough pieces to make
a fully red heart, sadly.

On a side note, the Musical Theater Guild's original MIT production, "Hack, Punt, Tool" that I was a part of this January period started its showings yesterday! So exciting - if you're in the area and have a chance, come and see!

Friday, January 27, 2012

PAPER MODEL LIGHTBOX

I was having a bit of trouble designing the pieces of my lightbox in my head and on paper, so I decided to make a quick paper model of what I wanted it to do. Next step: CADing it all in Solidworks so I can laser cut the frame!

Above: Lightbox paper model demo (sideways for some reason),
with Charles ([etotheipiplusone]) and Bailey ([ISOPACK]) discussing laser cutters.

...I need to cut my nails, haha. The lightbox will be able to prop open in both portrait and landscape mode, as well as have some room to fit sheets of paper and pens in between the layers.

Above: Initial thought process with the paper model lightbox.

Above: Paper model lightbox unfolded!

There's still a lot of soldering I need to do! >o<;

Wednesday, January 25, 2012

LEARNING ARDUINO + RGBETA

Back in Fall 2011, I decided to build a RGB variable color lightbox for a Power Electronics class (6.131). Since the existing [sleek] LED lightboxes on the market were about $50+, emitted white light, and didn't do much else, I wanted to make something that could do more. I wanted to be able to adjust the light color, the slope of the lightbox screen, be able to make and attach custom widgets (like my sliding T-square, or a future eraser-crumb gutter / pen holder, hidden shelves), etc - almost like a portable desk. For the class, I had to satisfy the power electronics part, so in hindsight, maybe I should have actually just made a motor controller. But afterwards, I still really wanted to make the actual lightbox product, so I started over, this time using an ARDUINO! For the first time! :D

Here's what I've got so far - a mess of wires (soon to be sorted), and 3 sliding 10K potentiometers on the left  that control the red, green, and blue color values. For the background soundtrack, you can listen to the two Jordan's at MITERS (the female of whom has an awesome blog: [T3CHNOLOCHIC]) discuss 'hella Bohemian (?)' for some reason:

(Apologies for shaky one-handed iPhone recording!)
Above: Video of RGBeta testing.

Thanks to Charles ([ETOTHEIPIPLUSONE]) for supplying me with the Arduino Nano and LED strips!

Arduino's are awesome (haha)! I write a bit of code, upload it to the Arduino, connect it to some LEDs and potentiometers... and things magically work! Plus, what's cool is that this little Arduino can do all the PWM magic digitally that I had to do analog-ly before for my class. Here was the first thing I made using it:

Above: Yay single RGB LED! Making it fade using an Arduino Nano.

In the above photo, I'm actually using a leftover Piranha LED that I bought for class, shipped from the UK. These little RGB LEDs gave me more trouble than expected, as the supplier website didn't have a datasheet, and after testing them I found that the LEDs were common ANODE [+] (whereas my design was tailored to common CATHODE [-]). Here are some surviving photos of my RGB lightbox, ALPHA version:

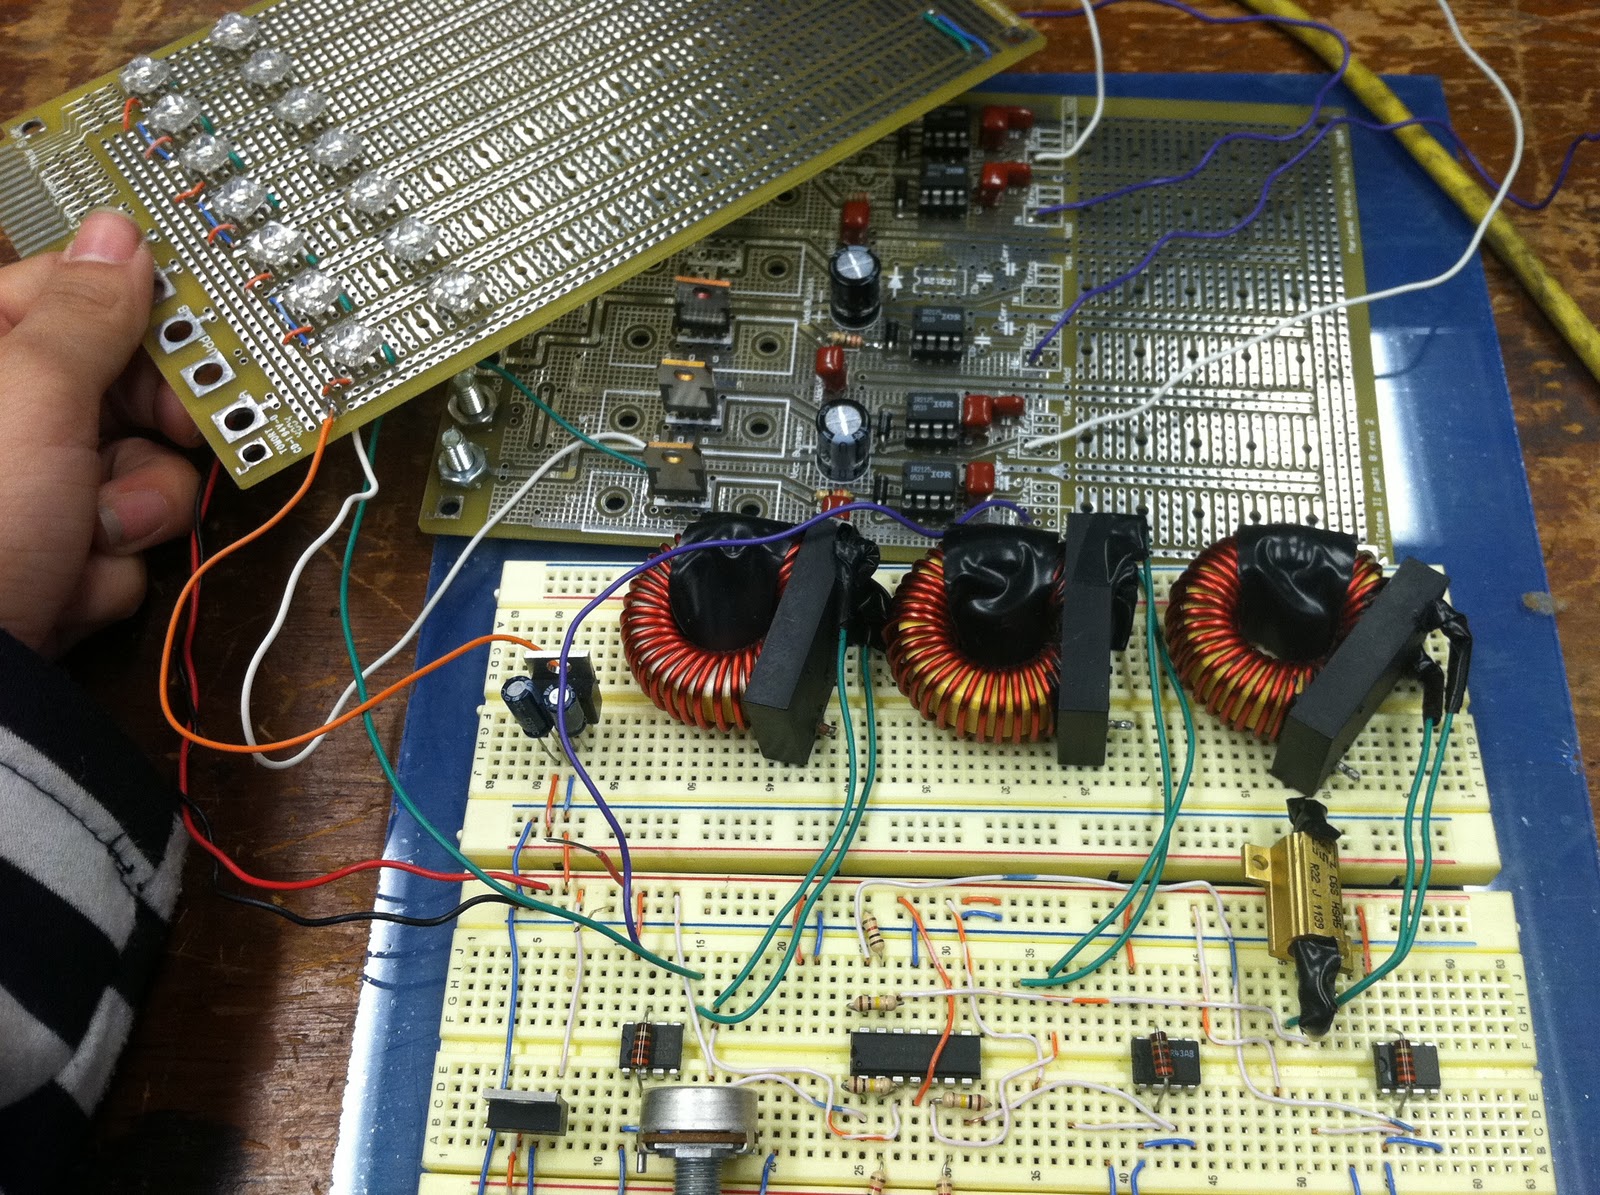
Above: It uses 3 buck converters, and (in this photo) is missing
2 power resistors and 2 potentiometers. The lightboard stacks on top.

Above: RGB lightbox Alpha testing. Sadly doesn't work quite as well,
and (in this photo) I've already blown a piranha LED just testing the first row, haha.

Comparing with what I have now, RGBeta is not as impressive looking as RGB Alpha, which had 3 legit-looking inductors and power resistors, as well as a separate board complete with 3 H-bridges (only lowsides used). But RGBeta is definitely cleaner and lighter, as well as less painful to make and debug. In fact, the only major debugging issue I ran into was because I forgot to make a common ground (my most common mistake), which ended up creating a flickering unstable light that semi-responded to the potentiometer slides. Grounding issues aside, RGBeta was definitely much easier to create.

Above: RGBeta is definitely more boss that RGB Alpha.

Side note: I've been unknowingly shortening my current 'RGB lightbox' to 'RGBeta' (pronounced R - G - Beta), since I consider this version the Beta version (the Alpha one being the one I made for class). Though, 'Beta' is probably not the right term to use, since this isn't a software release. What's more, every time I say it, it reminds me of RGVeda, the debut manga of CLAMP, and RigVeda [wiki], a sacred text of Hinduism - even though my lightbox is completely unrelated, haha. :)

Why do I want a lightbox? I confess, I'm biased as an artist and I'll mainly be using it to ink over sketches and learn animation. However, because it'll be a portable desk, the uses for it are limitless. (If I add a detachable cushion-y underside to the lightbox, I could set my laptop on top and have a comfy laptop lap desk, too! :D ). I discovered another use when Bailey ([ISOPACK]) was using a light to match up 2 printed circuit designs (for the top and bottom layer of the double-sided copper clad), in preparation for etching.

Above: Bailey's printed designs, in prep for DIY etching a printed circuit board.

I just need to solder on some more LED strips, provide a portable power supply, transfer circuit from breadboard to PCB (or other), design the frame and then build it!

In other news, I'm assistant choreographer to the 'Hack, Punt, Tool' original MIT screenplay put on by the MIT Musical Theater Guild, and hectic production week starts next week! It's my first time helping them out, and they're a cool bunch - lots of creative set/prop/costume builders! I was talking with the Head Choreographer TaunTaun, and we were lamenting how there wasn't a program that could help choreographers and directors do blocking and formations. As a dancer who has choreographed for several people, I also find it sad that the best of us resort to drawings and powerpoint slides to convey position. But usually in the end, all of us resort to pointing and physically moving people to where they're supposed to be. But that approach is time-consuming and often confusing for the dancers. If there was a program that could allow the choreographer to create and edit formations of people, atop a background of their choice (stage or theater set), synced with a soundtrack of music or lines (basically like a UI to making a simple animation), we wouldn't have to resort to doing something like this:

Above: An approach we used to block out a scene in Killian Court,
using spools as cast members. Later, one of the directors even made a
mini model of the set so we could visualize the space.

It sounds like this program could help anyone that just needs a quick way to explain a series of positions - dance formations, chess/checkers/go/board game strategies, WWII troop movements for history presentations, sports play strategies, film/book/comic storyboarding, re-creation of events, etc. This idea already ended up on the list of things I wanted to make, so let's hope I get to it soon!