Showing posts with label builds. Show all posts

Sunday, September 7, 2014

RWBY SCYTHE V2 + DRAGON CON 2014

Wherein I talk about how I built RWBY transforming scythe version 2 and other Dragon Con 2014 shenanigans! There's quite a bit I want to share in this blogpost, so bear with me, this post is going to be really long!


l
RWBY Scythe V2


Above is a video of RWBY scythe deploying.


ll
Dragon Con 2014 fun


Ruby and her male counterpart!


Shenanigans!
Left to right: Me (Ruby), Alison (Blake),
Charles (Charles on a little electric bike), Jamo (Jayce).


CAUTION: LONG POST AHEAD!
Click below to read more!

Tuesday, March 25, 2014

BUILDING RWBY SCYTHE PART 3 + ANIME BOSTON 2014

So last I left off (in the previous post that I forgot to name 'Part 2' in the 'Building-RWBY-scythe-series-of-posts'), I was in the middle of prototyping. That version was unfortunately scrapped (though not entirely) for the con. In hindsight though, the size was a good reference for the next version. But! For now, let me tell you about the RWBY scythe I build for Anime Boston.

TL;DR:
  • RWBY unfolding scythe unfolded manually, but broke before and during the con.
  • This version was made of MDF (hardboard from Home Depot), aluminum tubes, two pairs of 3D printed parts, and two commercial steel drawer slides. It weighed ~22.5lbs.
  • Next version is already in the works.
  • I had fun at the con! Despite being sick and exhausted. Thank you, friends, for your support!


This is going to be a very very long post, divided into the following parts:

I
RWBY scythe build (Part 3)

Folded all together. (Minus the Tail pieces)

Unfolded. (Minus the Tail pieces)

Size comparison. This thing was too heavy for the size to be practical!

How the front mechanism was supposed to work, shown in my CAD.


II
Anime Boston 2014 report

My cosplay group! Thank you guys for being troopers!

Me unfolding it at the Con panel. Thanks for holding it stable for me, Tony! Er-- Brian!

The 18in lasercut MDF scythes I made for Charles and me for the Con on Sunday.


CAUTION: LONG POST AHEAD! 
Click below to read more!

Monday, February 3, 2014

SUN + RWBY + OTHER ARTS


Last December, after more than a year of not visiting family, I flew down to Florida for a week to meet up with the ol' crew again - mom and dad, along with some of my cousins and friends and families of friends. They had driven down to meet me there, ready for beaches and a Christmas without snow and cold, which Florida readily gave. The trip had been a long time coming, and seeing family again really brought back memories. I took the opportunity to catch up, to soak in the presence of the people who I had lived without for the past few years, to breathe in a salty air that was so unlike the air up north, to drink in the scenery of sky, water, and sand. A week's worth of family and sun rejuvenated me. It was more than enough - I was ready to go back and tackle the new year.

Happy 2014! Happy year of the horse!

There's a full lineup of things-to-happen this year - but I'll start with just updating on the things I've already worked on so far. This is a LONG and PICTURE-HEAVY post! Contents are below, click the 'Read more!' to read more!

In order of appearance:

I
An update on RWBY scythe


II
A recap of my week in Florida


III
A living-hinge book cover I designed


IV
Some speedpaints I did


Click below to read more!

Sunday, November 3, 2013

MT WASHINGTON + D*C 2013

Around mid-September, I attended the Mt Washington Auto Road Alternative Energy Summit with Charles [etotheipiplusone] and friends, along with the MIT EV team. It was a gathering of mostly electric vehicles, ranging from home-grown motorcycles to commercial Model S's and Volts and Leafs, with a smattering or others, including steam and solar. A really cool bunch of people, a beautiful two days of nature, and lots of electric vehicles - Awesome! 

Above: The parking lot at the top of the AutoRoad.
There were a lot more motorcyclists than are shown here at the summit that day!

Above: View from the bottom camp grounds.

I took some panaromic shots, to try out the "Automate - Photomerge" feature in Photoshop - It's a pretty nifty tool!

Above: Panoramic view of the Summit grounds at the Mt. Washington AutoRoad.

Above: Panoramic view of the view on the road halfway up the mountains.

Warning: PICTURE HEAVY POST!
Click below to read more about my adventures at Mt Washington and Dragon*Con 2013!

Sunday, June 2, 2013

CELTY + ANIME BOSTON 2013

At Anime Boston this year (2013), I cosplayed as the character Celty Sturluson, the modern take on a Dullahan from the anime "Durarara!!" (exclamations points included). Boy was this an adventure, from decision to materials to construction and then to actual physical cosplay. Let me break this down - what I did, what I would do next time, how it all went, etc. And hopefully, my documented experiences here would help inspire any future Celty cosplayers!

In truth, this isn't so much an instruction blog for how to make a Celty helmet and scythe, but more of a trial and error log, tips and advice column, and experimentation report from an amateur cosplayer. But I digress-

LET'S START!


WARNING: This is a VERY LONG and PHOTO HEAVY POST! Read on after the break!

TL;DR points:
  • Start early! If you decide to make your own helmet and scythe, make sure you have the materials well ahead of time!
  • Plan ahead! Working with Bondo requires an extraordinarily and painstakingly tedious amount of sanding, and any sort of paintwork needs time to dry!
  • Have plenty of sleep and rest! It was interesting to note that most of my freehanding work did come in the late hours of the night and while they still managed to come out quite well, I do NOT recommend this method to others. Sleep is important, especially when working with tools and details!


(Read on!)

Thursday, February 21, 2013

ARDUINO MUSIC GLOVE + MOTORAMA 2013

In the fall 2012 semester, I was part of a Media Lab (MAS) class that introduced Electronic Musical Interfaces. We went over a wide array of controllers and instruments - from sticks to handhelds to clothing to classical instruments to mixed and new breeds, using light, circuit noise, physical objects. As a final project for the class, we had to make a working musical controller, for which I decided to utilize the Arduino.

Above: Left glove to the left, and right glove to the right.
And yes, those are purple surgical gloves.

Above: Looks like I'm about to do some surgery!

Additionally! In February, just this past weekend (2/16-17), I attended the Motorama 2013 event in Harrodsburg, PA, for the sole purpose of Robot Conflicts - a Robot competition held there. I road-tripped down with 4 other guys, 3 of whom brought robots to compete. From what I've gathered, Motorama was a showcase of pimped out dirt bikes, go karts, and other wheeled vehicles that race for some prizes. It worked like a convention + fair + vehicle show, with tents of sponsored racers, 100+ vendors, a really really big carnival-style food court, and other such rooms and events. I only stuck around the Robot arena, so I didn't fully experience the event, but I didn't mind- The robot event alone was awesome enough!

Above: Charles, Dane, and Adam working on last minute adjustments on their robots.

Above: View of the audience from behind the robot combat stage.
There's another stand on the other side of the stage, but this side was always more populated.

Above: One of the highlights of my robot weekend - Charles' robot "Uberclocker Advance"
picking up other robots to bash against other robots.

Read more by clicking the link below!

Thursday, November 29, 2012

OMG RWBY

RWBY - Red White Black Yellow

I've been a fan of Monty Oum's work since I discovered his Dead Fantasy series a few years ago, and was thrilled to hear of his new work with Roosterteeth - RWBY. After watching the trailer, I have to say...

It was like love at first sight. The music caught my breath, the fighting choreo and animation blew me away, and that weapon the main character uses, the Crescent Rose... I fell for it. So hard. If you haven't seen the Red trailer for his new webseries premiering 2013, check that out below before reading further: 


You see that gunscythe? I want to build that gunscythe.

No, wait.

I will build that gunscythe. A full-size model that would pack and unfold as the animation suggests (or as closely as I can replicate it). First, a paper model to visualize the shapes and use the dimensions to scale to a possible CAD model, then a small-scale model to test out any details, then, the final large-scale model.

After brainstorming and sketching out possible ways to make this thing work in real life, I paused to make a static version of the fully-extended head of the gunscythe from computer paper.

Above: The paper Crescent Rose head on a backdrop of my sketchbook.

Read more...

Friday, November 23, 2012

D*CON AND KURONEKO-BOT

Aug 31-Sep 4, 2012 - My very first Dragon*Con, and Robot Battle. Belated as it is, let me share a few of the things I learned about building my first antweight robot.

TL;DR:
Don't use motors encased in plastic for your competition robots.
Don't skimp on good wheels.
Learn to drive.
You can't beat real-time combat experience in improving your robot design skills.

Above: Before leaving for Atlanta, GA.

Above: Final design.

Read more...

Sunday, February 12, 2012

BRIGHT LIGHTS

(Side note: I was actually planning to update yesterday, but the original RGBeta demo video was somehow corrupted and wouldn't upload past 50%. So here's the post today!)

Halfway through soldering on the LED strip wires, I realized that I could have made the job simpler for myself if I had created just 4 rails (common anode, red, green blue) for each LED strip to attach to, instead of making separate individual connectors for each LED strip that would attach to the actual electronics board. Plus, it would have also been a much cleaner and simpler design! On the upside, the lights all worked, and now each strip could be controlled!

(Running off default Arduino PWM frequency - might change later)
Above: RGBeta lights demo!
Oh, MITERS people - listen to how awesome and random they are.

Above: TANGLE OF WIRES, OMG. ><

Plan: I'm going to hot glue all the solder joints, tape the connection wires together so they're not in that sprawling mess like in the photo above, and construct the box! Unfortunately, I have no access to a laser printer anytime soon, so there's 2 options: (1) cut and shape a box by hand from scrap wood (I'll have to make a new CAD drawing for this), or (2) use an old scanner as a base. When I had finished the soldering and was contemplating how to make the box, Steve from MITERS offered up an old scanner that was lying around. Though it's a bit too large to fit inside my backpack, the depth of the scanner looked perfect for the distance between the LEDs and the diffuser - I'll keep it as a Plan B at least!

Also, since this was the most soldering I've done in one sitting yet, I learned to use a new trick! I bundled up each colored wire together and soldered the ends all in one round - I should have thought of this earlier, haha. In fact, the veteran solder-ers all replied they knew of this trick already! I guess that's what experience is all about...

Above: Group soldering in process.

On another note, the school semester started this week! I have some things I want to build and do during this time, so hopefully my time won't be completely eaten by my schedule!

Sunday, February 5, 2012

SOLIDWORKS + RGBETA

Quick update! Ever since I downloaded Solidworks yesterday, I've discovered that Solidworks is so much fuuun!  I turned my messy layer sketch of RGBeta's shell...

Above: Messy thought doodles!

...into something that looks much neater and makes more sense!

Above: It looks like a box! xD

Above: A semi-transparent view of RGBeta's box - the completely transparent view was
much too messy for me to get a good angle on.

It measures 13x12 in, scaled to fit in my backpack, opens up in both portrait and landscape mode, has a hidden paper storage section, and has a small pencil case to the bottom right! (Box is suited for right handers!) The upper right corner stores all the electrical components that drives the LED strips that will be located in the top box. The 3 open grooves up top are meant to hold the sliding potentiometers that control the RGB values of the LEDs. Now the only things that are missing from this model of the frame are the hinges and tiny locks (that keep everything from falling apart)! But fortunately, there's only a small amount of adjustment that will need to happen to this Solidworks model when I secure the ones I want, and the hinges won't affect the overall structure or size much. Now, how to find access to a laser printer..............

In the meantime, I'll be playing around with splines, haha.

Friday, January 27, 2012

PAPER MODEL LIGHTBOX

I was having a bit of trouble designing the pieces of my lightbox in my head and on paper, so I decided to make a quick paper model of what I wanted it to do. Next step: CADing it all in Solidworks so I can laser cut the frame!

Above: Lightbox paper model demo (sideways for some reason),
with Charles ([etotheipiplusone]) and Bailey ([ISOPACK]) discussing laser cutters.

...I need to cut my nails, haha. The lightbox will be able to prop open in both portrait and landscape mode, as well as have some room to fit sheets of paper and pens in between the layers.

Above: Initial thought process with the paper model lightbox.

Above: Paper model lightbox unfolded!

There's still a lot of soldering I need to do! >o<;

Wednesday, January 25, 2012

LEARNING ARDUINO + RGBETA

Back in Fall 2011, I decided to build a RGB variable color lightbox for a Power Electronics class (6.131). Since the existing [sleek] LED lightboxes on the market were about $50+, emitted white light, and didn't do much else, I wanted to make something that could do more. I wanted to be able to adjust the light color, the slope of the lightbox screen, be able to make and attach custom widgets (like my sliding T-square, or a future eraser-crumb gutter / pen holder, hidden shelves), etc - almost like a portable desk. For the class, I had to satisfy the power electronics part, so in hindsight, maybe I should have actually just made a motor controller. But afterwards, I still really wanted to make the actual lightbox product, so I started over, this time using an ARDUINO! For the first time! :D

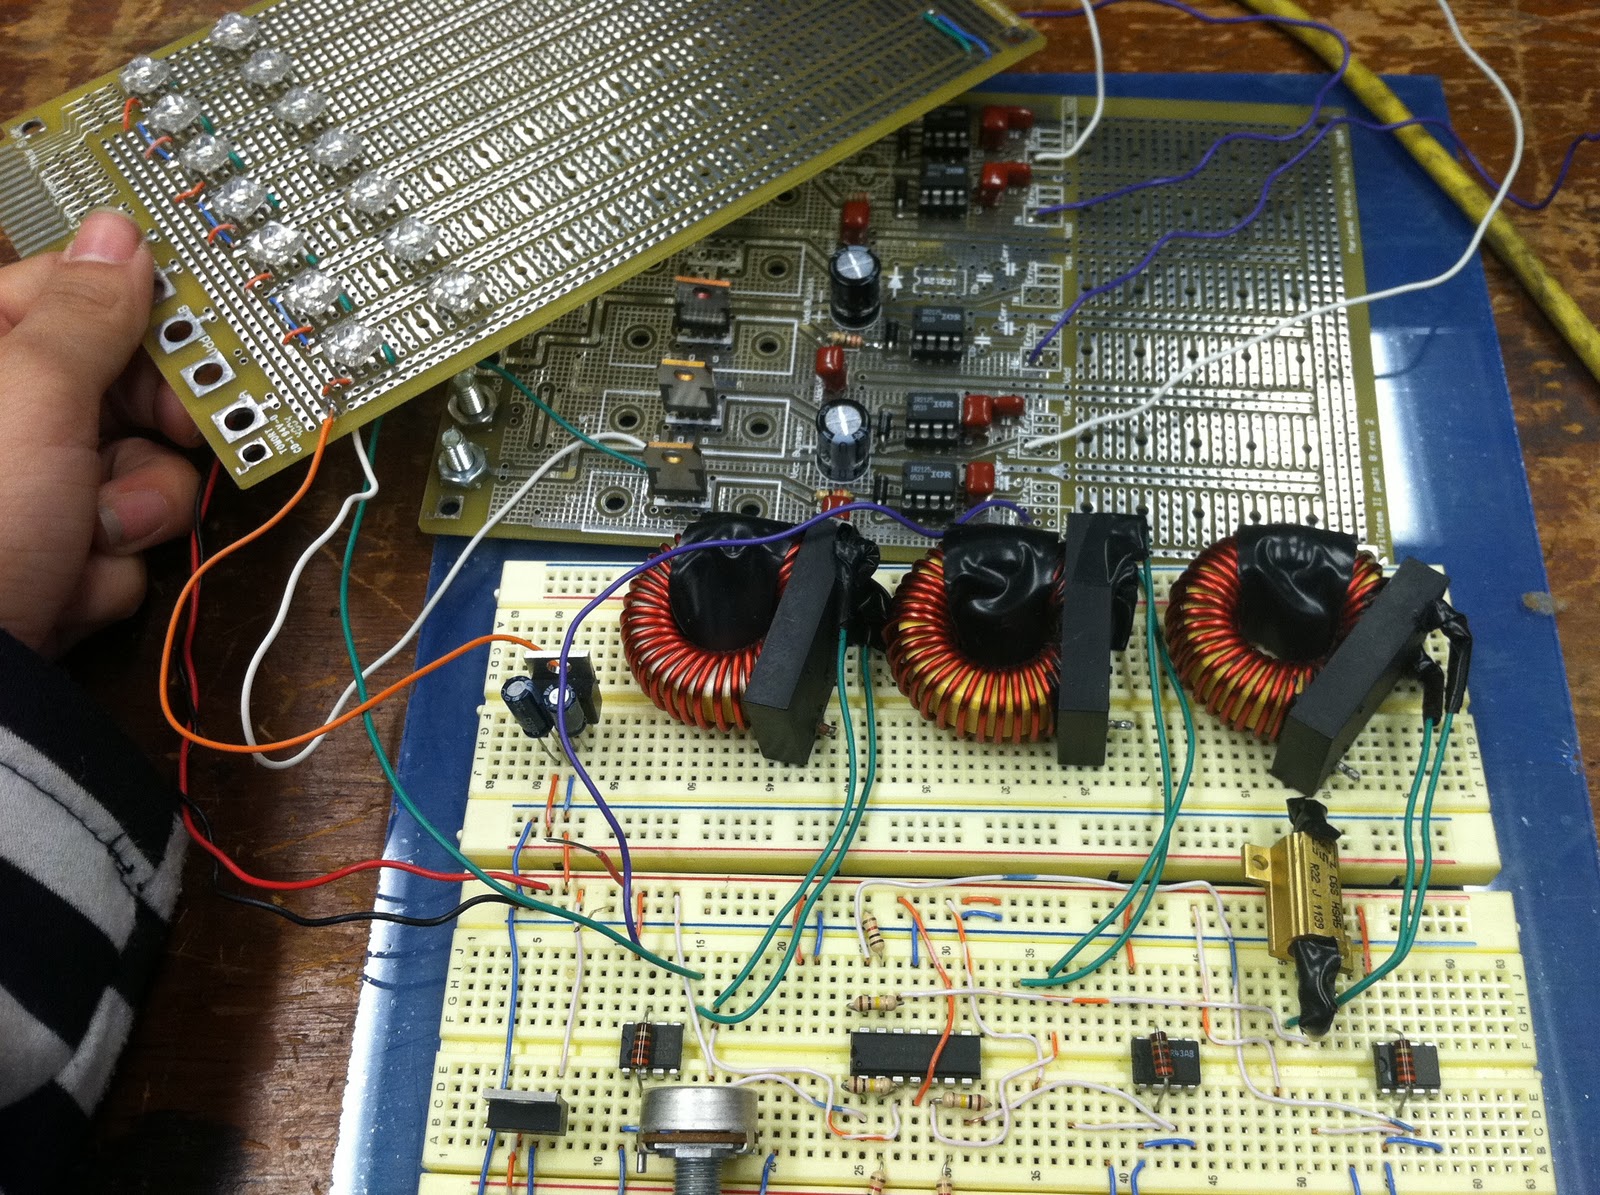
Here's what I've got so far - a mess of wires (soon to be sorted), and 3 sliding 10K potentiometers on the left  that control the red, green, and blue color values. For the background soundtrack, you can listen to the two Jordan's at MITERS (the female of whom has an awesome blog: [T3CHNOLOCHIC]) discuss 'hella Bohemian (?)' for some reason:

(Apologies for shaky one-handed iPhone recording!)
Above: Video of RGBeta testing.

Thanks to Charles ([ETOTHEIPIPLUSONE]) for supplying me with the Arduino Nano and LED strips!

Arduino's are awesome (haha)! I write a bit of code, upload it to the Arduino, connect it to some LEDs and potentiometers... and things magically work! Plus, what's cool is that this little Arduino can do all the PWM magic digitally that I had to do analog-ly before for my class. Here was the first thing I made using it:

Above: Yay single RGB LED! Making it fade using an Arduino Nano.

In the above photo, I'm actually using a leftover Piranha LED that I bought for class, shipped from the UK. These little RGB LEDs gave me more trouble than expected, as the supplier website didn't have a datasheet, and after testing them I found that the LEDs were common ANODE [+] (whereas my design was tailored to common CATHODE [-]). Here are some surviving photos of my RGB lightbox, ALPHA version:

Above: It uses 3 buck converters, and (in this photo) is missing
2 power resistors and 2 potentiometers. The lightboard stacks on top.

Above: RGB lightbox Alpha testing. Sadly doesn't work quite as well,
and (in this photo) I've already blown a piranha LED just testing the first row, haha.

Comparing with what I have now, RGBeta is not as impressive looking as RGB Alpha, which had 3 legit-looking inductors and power resistors, as well as a separate board complete with 3 H-bridges (only lowsides used). But RGBeta is definitely cleaner and lighter, as well as less painful to make and debug. In fact, the only major debugging issue I ran into was because I forgot to make a common ground (my most common mistake), which ended up creating a flickering unstable light that semi-responded to the potentiometer slides. Grounding issues aside, RGBeta was definitely much easier to create.

Above: RGBeta is definitely more boss that RGB Alpha.

Side note: I've been unknowingly shortening my current 'RGB lightbox' to 'RGBeta' (pronounced R - G - Beta), since I consider this version the Beta version (the Alpha one being the one I made for class). Though, 'Beta' is probably not the right term to use, since this isn't a software release. What's more, every time I say it, it reminds me of RGVeda, the debut manga of CLAMP, and RigVeda [wiki], a sacred text of Hinduism - even though my lightbox is completely unrelated, haha. :)

Why do I want a lightbox? I confess, I'm biased as an artist and I'll mainly be using it to ink over sketches and learn animation. However, because it'll be a portable desk, the uses for it are limitless. (If I add a detachable cushion-y underside to the lightbox, I could set my laptop on top and have a comfy laptop lap desk, too! :D ). I discovered another use when Bailey ([ISOPACK]) was using a light to match up 2 printed circuit designs (for the top and bottom layer of the double-sided copper clad), in preparation for etching.

Above: Bailey's printed designs, in prep for DIY etching a printed circuit board.

I just need to solder on some more LED strips, provide a portable power supply, transfer circuit from breadboard to PCB (or other), design the frame and then build it!

In other news, I'm assistant choreographer to the 'Hack, Punt, Tool' original MIT screenplay put on by the MIT Musical Theater Guild, and hectic production week starts next week! It's my first time helping them out, and they're a cool bunch - lots of creative set/prop/costume builders! I was talking with the Head Choreographer TaunTaun, and we were lamenting how there wasn't a program that could help choreographers and directors do blocking and formations. As a dancer who has choreographed for several people, I also find it sad that the best of us resort to drawings and powerpoint slides to convey position. But usually in the end, all of us resort to pointing and physically moving people to where they're supposed to be. But that approach is time-consuming and often confusing for the dancers. If there was a program that could allow the choreographer to create and edit formations of people, atop a background of their choice (stage or theater set), synced with a soundtrack of music or lines (basically like a UI to making a simple animation), we wouldn't have to resort to doing something like this:

Above: An approach we used to block out a scene in Killian Court,
using spools as cast members. Later, one of the directors even made a
mini model of the set so we could visualize the space.

It sounds like this program could help anyone that just needs a quick way to explain a series of positions - dance formations, chess/checkers/go/board game strategies, WWII troop movements for history presentations, sports play strategies, film/book/comic storyboarding, re-creation of events, etc. This idea already ended up on the list of things I wanted to make, so let's hope I get to it soon!

Thursday, January 12, 2012

SLIDING T-SQUARE + SKETCHES

I've always been big into the whole Japanese anime and manga scene, and there was a period that I drew almost consistently. In the past few years however, I haven't drawn much in relation, but I'm going to try and keep improving! Expect more sketches in the future, but in the meantime, here's a bit of what I've drawn and doodled in the past few days. I'm currently working on a commission I can't reveal yet, and I've plans for a doujinshi if not a webcomic as well. But time will tell, I'll post more of my ideas as they come!


That last one, the super-sketchy one with Miku on some sort of bipedal machine, is still a work in progress! You'll definitely see more of her in various other getups. :) (You can also see a little of where I possibly could have gotten influenced, haha)

Back to my building things, I had this flimsy $1 T-square that I wanted to mount onto my (wip) lightbox as a detachable widget. Most T-squares are standalone, cheap and really good tools, but I personally found them unstable if I wasn't drawing on the edge of a table or a raised surface. So I thought it'd be a nifty add-on for my (future) lightbox - the added track on the side would make the T-square stable, always aligned, and if I wanted it for something else, detachable!

Above: Finished Sliding T-Square.

It was made using a cheap curtain track (wall mounts included), a set of small shower rollers, and some screws and rubber stoppers.  The shower rollers actually fitted very snugly inside the railing, which was a pleasant surprise since I had eye-estimated it at the store. Here's a closeup:

Above: Small shower rollers, screws included.

Above: Attached to the curtain wall mounts like so.

The rubber stoppers I had were easily stripped inside using the screw, so I cut the outside of the hole out to make way for a metal washer that would hopefully catch the screw and not damage the stopper. The last stopper still kept slipping off, and since I had scrounged up the stoppers in MITERS and couldn't find any more, I just superglued that stopper. xD

Above: The operation.

Above: Front and back views of the completed widget.

I originally had wanted to use each of the wall mounts separately, and place them at the opposite ends of the T-square head. But that was too unstable, so I tried to fit both rollers and stoppers on the same wall mount, like so:

Above: A failed attempt at being thrifty.

But that turned out to clash with the shape of the T-square, which had a square depression on the back that was smaller than the length of the stoppers surface. Thus! I opted for connecting the two wall mounts instead of buying more rollers. All that was left was to glue the T-square on the rubber stoppers (using GOOP), and voila! A completed widget:

Above: Ready to roll! (hehe)

Next up on my agenda: 1) redesign my lightbox schematics, and 2) work on comic. I wonder when I'll actually start my scooter, hmm...