
So last I left off (in the previous post that I forgot to name 'Part 2' in the 'Building-RWBY-scythe-series-of-posts'), I was in the middle of prototyping. That version was unfortunately scrapped (though not entirely) for the con. In hindsight though, the size was a good reference for the next version. But! For now, let me tell you about the RWBY scythe I build for Anime Boston.
TL;DR:
- RWBY unfolding scythe unfolded manually, but broke before and during the con.
- This version was made of MDF (hardboard from Home Depot), aluminum tubes, two pairs of 3D printed parts, and two commercial steel drawer slides. It weighed ~22.5lbs.
- Next version is already in the works.
- I had fun at the con! Despite being sick and exhausted. Thank you, friends, for your support!
This is going to be a very very long post, divided into the following parts:
I
RWBY scythe build (Part 3)

Folded all together. (Minus the Tail pieces)

Unfolded. (Minus the Tail pieces)

Size comparison. This thing was too heavy for the size to be practical!
How the front mechanism was supposed to work, shown in my CAD.
II
Anime Boston 2014 report

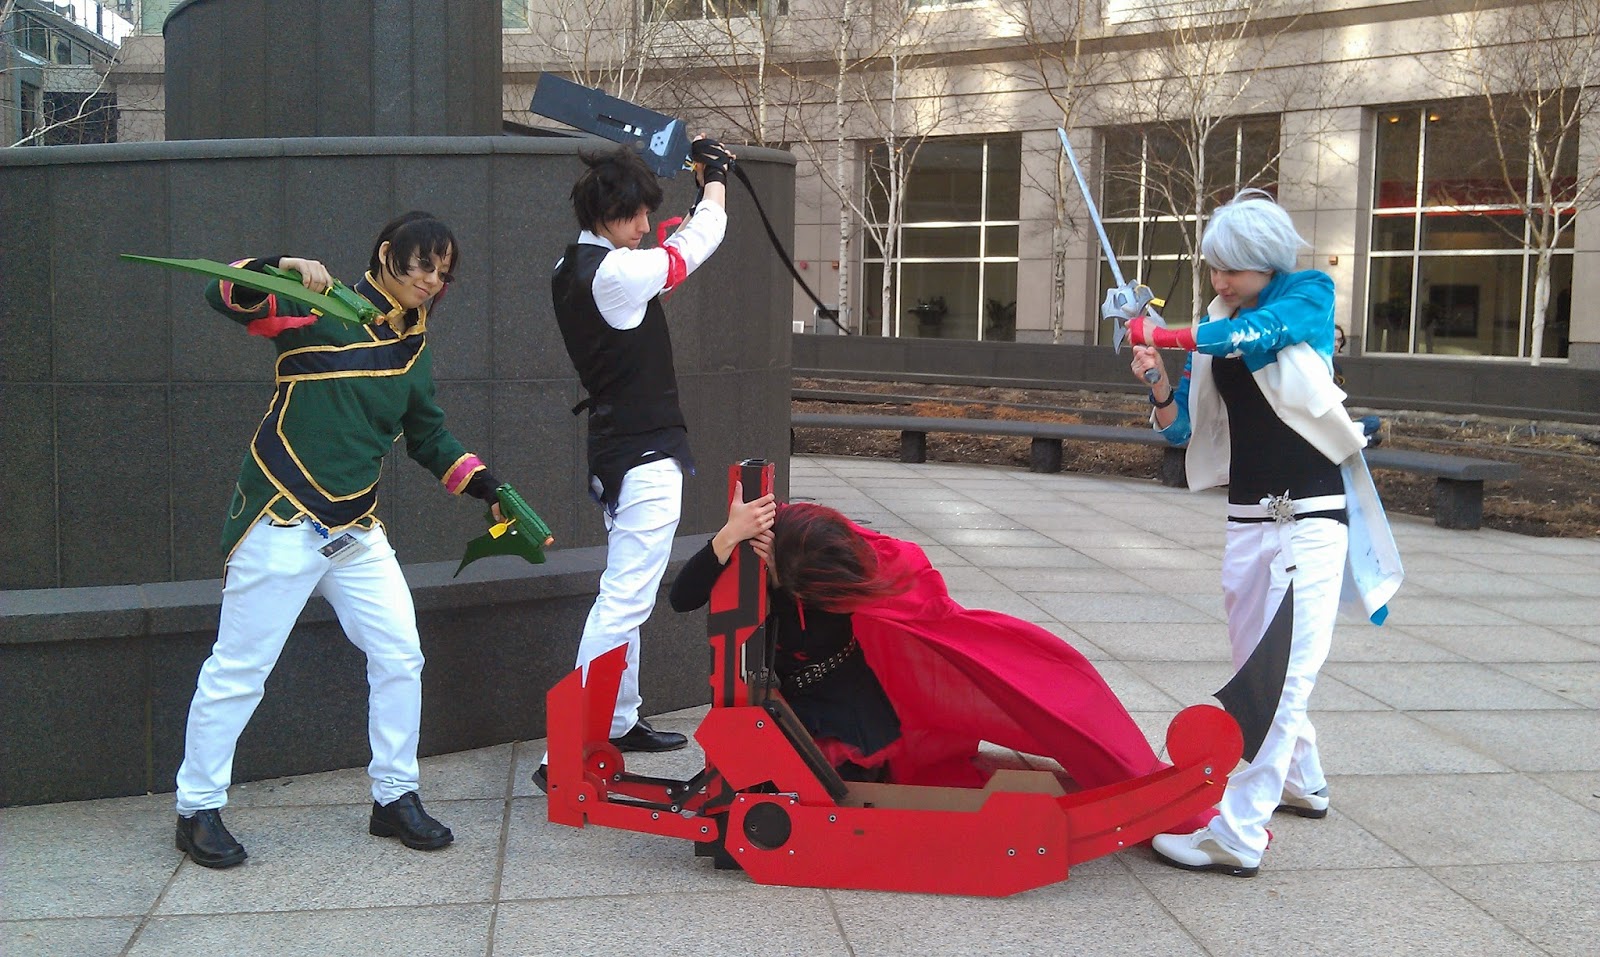
My cosplay group! Thank you guys for being troopers!

Me unfolding it at the Con panel. Thanks for holding it stable for me, Tony! Er-- Brian!

The 18in lasercut MDF scythes I made for Charles and me for the Con on Sunday.
CAUTION: LONG POST AHEAD!
Click below to read more!
-
I
-
So before I show you a flurry of pictures, I just wanted to say that this has been the most mechanically complicated thing I've ever built so far. It's my first 'Big Integrated Mechanical Project', as Charles calls it. And as such, I learned so much during the process, everything from designing to making to panicking. I'll try and encapsulate as much as I can in this space, though the real lesson here is that you just have to try and do it yourself to gain the experience. Whatever your skill level, don't fear, just build! (`・ω・´)”
OK! Let's delve in-
For the rose accessory on Ruby's belt, I knew I wanted a lasercut black acrylic backing and metal petals. At the con, however, I found that the metal pieces weren't entirely secured on the black acrylic, so next round, I'll find a way to laser etch on a silver coated piece of material, such that the part it etches becomes black, or on clear piece of acrylic with one side coated black and one side coated silver, such that the etch on the black side will reveal the silver underneath.
But I really like the metal sheen for the petals, so I stuck with waterjet for this round. Taking a reference photo found online, I vectorized the image and exported it to DXF for the waterjet. I printed 3 versions of the rose - one full outline, one for just petals, and one for the spidery web that's the inverse of the petals. The waterjet surprisingly held up to the level of detail required for the rose 'web'.

CAD to DXF for waterjet. Thank you MIT Hobby Shop!

Just out of the waterjet.

Surprisingly fine details. There were still some kinks, but I'm glad it worked out!

Ruby's rose and the inverse!
The past prototype didn't consider the placement of a backbone for the entire structure, which made that version rather weak, and depended on a custom-designed rail system for extension, which was not structurally sound. So this version was built around a 2ft custom aluminum bar (ordered off of Onlinemetals.com), and two 2ft (extended) steel drawer slides (from McMaster-Carr). The steel drawer slides turned out to be much heavier than expected (I underestimated the weight specs of all materials in general), but these three metals provided a solid skeletal backbone for my entire structure (I assumed), and provided me the full-extended length I needed for the scythe.

Side by side comparison.
I say 'assume', because it actually didn't turn out to be the case. As always, the weakest link was what broke the scythe in its final hour at the Con Saturday - the screws and their connection to the aluminum backbone. As tough as the metals were, their link to each other was weak and perhaps not machined well. I had drilled and tapped those holes by myself after all, and used modified screws, so perhaps there was not enough grip. Post-analysis work is in the progress though.

Mark where you want to drill clearly.

I found out about this during the build and though it was a nifty little tool.
It's called the center punch and helps to guide the drill bit to the position you mark.
It makes a rather loud staplegun-like sound though- The first time I used it, I freaked out a little, haha.

Clamp your metal down securely.
Apply generous amounts of cutting fluid when you cut into metal!
Practice good safety protocol and wear safety goggles too!

Once you drill the hole, clean it out and then use the correct tap size.

Tap tap tap tap.
Notice the hole on the right? That was tapped from the other side, so you see the burrs.

Screw in the drawer slides!

Final full length!

Using the cold saw to cut the aluminum tubes.

.....I accidentally cut straight through the receipt and specs paper hidden inside one of them.

Whoops! (゜▽゜;)

Measure out where you want the drill into the tubes clearly!

I had to modify the lengths of the screws a bit, so I screwed them all temporarily on a piece of MDF,
then used the belt sander to sand out the ends.

Testing them each to make sure they were all the right length.

The final difference in length.

Drilling through the tubes.

Tap tap tap tap tap.
Apply lots of cutting fluid!

Tubes screwed in as well!

Lasercutting out size references on MDF.

About as big as it will be.
Unfortunately, I forgot the width of this thing will also be really big!

Using zip-ties to prototype a motion.
Yes, you can prototype with zip-ties.

And in the unfolded position.

Materials used to prototype.
I'm pretty sure you can prototype with just about anything.
Depending on the task and intended purpose, of course.

How small and precise the holes were.
Made with an exact-o knife.

Part of my structure involved printing some 3D blocks.
Well, not entirely blocks. They had two holes in them.
But still considered blocks.

I can't believe the first time I use the 3D printer at Charles' lab I make blocks. xD *facepalm*

Drilling the holes out a little more to provide less traction.
Please note - if you do this, clamp the part down and don't freehand it like me!

I consulted Brian a few times on latches for my design;
his Iron Man suit is wicked awesome and uses some cool latches.
These were my modified (and heavily simplified) versions of his latches, waterjet from thin steel.

Tap tap tap tap.

Hot off the lasercutter.
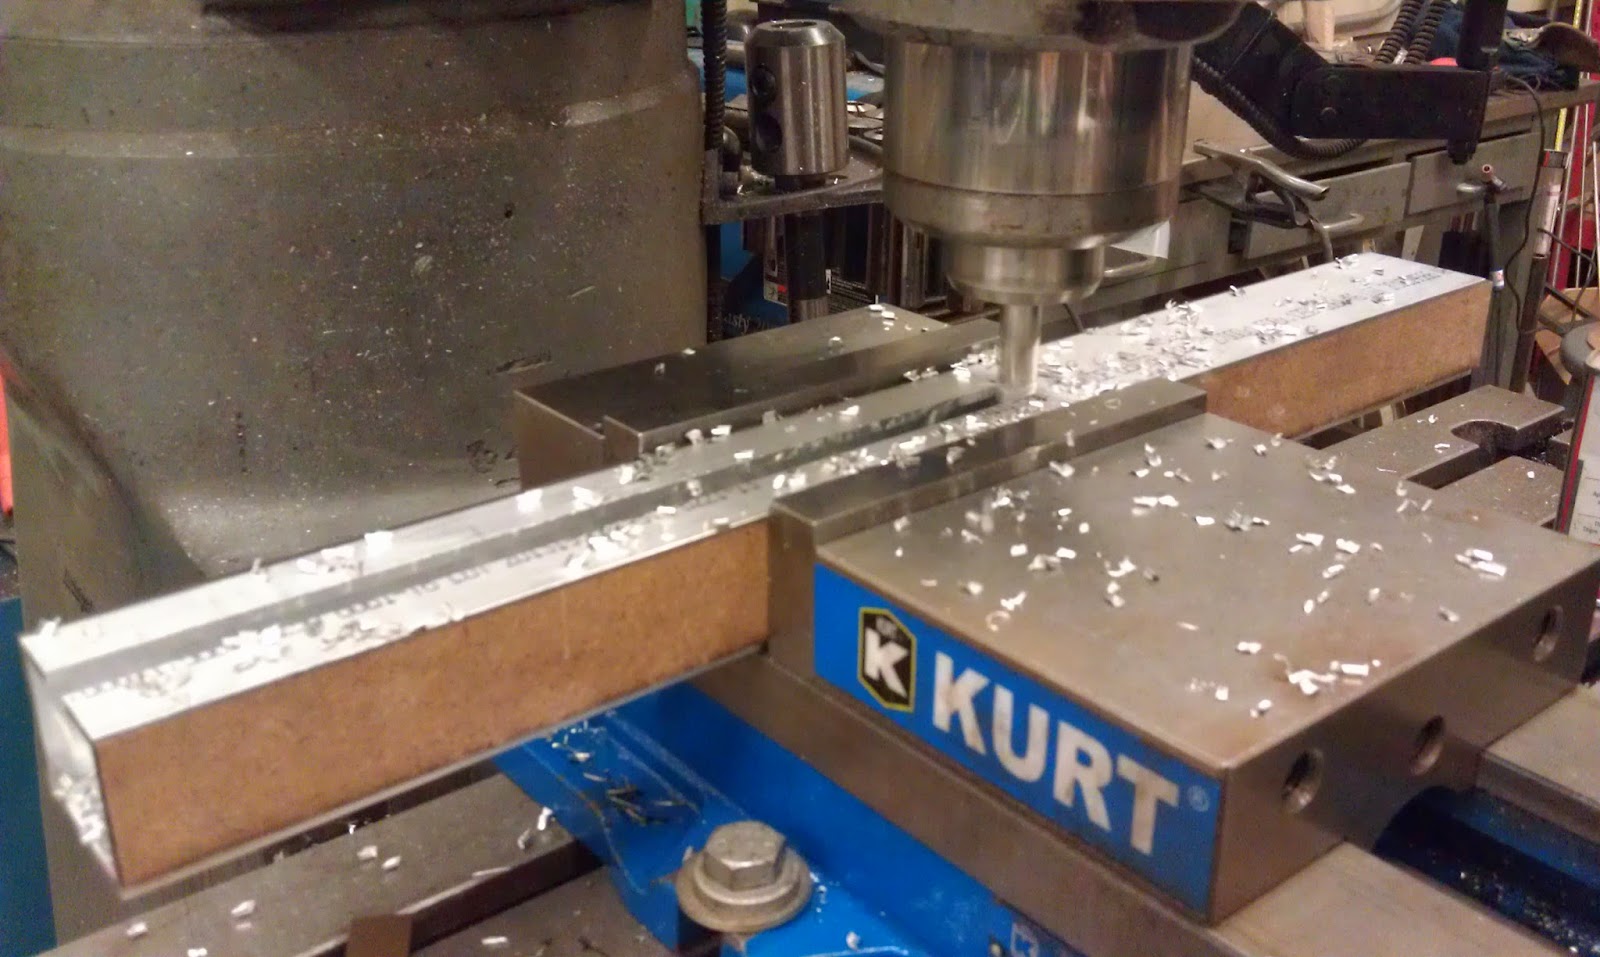
Milling the top tube, as per design.

Using a hot wire cutter to cut some foam, as per design.
My design was heavily dependent on custom pin joints and linkages. Parts of the scythe had to rotate, so I consulted Charles and we decided to use E-clips to 'trap' the piece around small hollow aluminum rods. So I designed the unfolding mechanism based off of that design choice. Now I know there's a whole field of study and math to determining the motion of linkages, but a lot of my design just came from thought and tweaking the positions a little until the movement came out to my satisfaction. Charles in particular was very helpful in providing feedback to my ideas, and his suggestion on the back blade design worked very well!
Once all the pieces were in place and layered as closely to the reference GIF as I could possibly make it, I measured out the pin joint distances and gave that drawing to Charles, who helped me make those using a lathe.

The clean part of my workbench. Look at all those numbers...
Above is a sneak peek of part of my notebook, to show you the ridiculous chaos that went into the design. What I'm showing in the video was more pertinent to the latest design; there are about 15 more pages before this that went into the previous two prototypes and about 10 after that still dedicated to assembling the design. I figured taking a short video was better than scanning in some of the pages for now, especially since all of the sketches look like chicken scratch, haha.

Charles helping me make the joints on the lathe. Thank you Charles!

E-clip pin joints + 3D printed part + wooden linkages

The wooden dowels were integral to the movement. They broke, unsuprisingly, haha. Next round will have metal rods, if I even stick with the same mechanism. There was also supposedly a reason why I used wood instead of aluminum. But I'm not sure now. By most all accounts, I would think metal would appeal to me more as the better choice. This should teach me (among all the other lessons I've learned with building this) not to design and/or build in the wee hours of the morning after not sleeping.
Wait. Didn't MIT already teach me this? xD

Spray-painting.

More spray-painting.

What spray paint does to foam. ( ̄□ ̄;)!!

Look! A flower! (*‿*✿)

So. Much. Epoxy.
I think I drained the shop's supply of epoxy doing this...
I also made a mistake in orientation and had to chip it off (twice) to redo the job.
Unfortunately, the epoxy had bonded to paint rather than wood, which proved troublesome later.

See the mistake here? Don't worry - I fixed it in the next few pictures.

Working area. So much red--

Muzzle 50% complete!

Side view. This thing was really big. xD

Size comparison of Ruby's scythe with M!Blake's weapon.
What 'My thing is bigger than yours' joke can I make here?

Epoxy detaching itself because bond wasn't strong enough on paint. :(
Despite the troubles, I ended up hefting the thing off to the con regardless (see more about my adventures below in the next section). And even though the inner core structure broke a bit and came loose, it still came back in one piece!

Closed position. After con.

Open position. After con.

Size comparison. After con.
In terms of revision control, I'm considering the PVC tube version as Version 0.1 and the first lasercut batch version as Version 0.2. Which means the big hulking red thing on that project shelf below will be my official Version 1. (You can see a bit of Version 0.1 behind it; Version 0.2 is hidden in between).

And here thou shalt live until next I dissemble thee...
This project is by no means over yet. I've got more plans for RWBY scythe, and I'm going to be working on making it lighter, more stable, better actuated, all that jazz. If you happen to be reading this and want to support me in my endeavors, feel free to hit the donate button on the menu to the right, and send me your name so I can thank you in my own little way! (Or don't, if you'd like to remain anonymous, haha. Though honestly, please let me know who you are so I can thank you!)
In general, here are some things to consider when you're building that don't get emphasized enough:
- Lead time of materials
- Especially if you're outsourcing parts to be 3D printed or lasercut or waterjetted.
- Most suppliers are fairly quick, but guaranteed next day shipping will always cost more.
- Weight of materials
- Can't stress this enough! For a build that depends on you being able to lift and carry it around for the duration of a con, while still being able to manipulate it, weight should of been high in the list of initial requirements, but it was somehow overlooked.
- Lead time of painting and/or glue and/or drying
- Paint not having enough time to dry will result in a less-than-satisfactory finish.
- Rushing a drying job usually results in frustration - try and find other ways of fastening if you can, especially for parts you'd like to repeatedly disassemble and reassemble.
- Cost (Both in currency and personal sacrifice)
- It's good to plan budget ahead of time, but time will always get ahead of you, so make sure you leave buffer room for those last minute buys!
- If you can do it, don't sacrifice your personal health and safety to save time. I learned that the hard way. As Jamo put it - There will always be another build, but there is only one you.
- Working around lab hours and other people working in the same space
- Don't just assume the lasercutter or 3D printer will be free the time you want to use it. Chances are, it won't be, especially it's a shared space. Find out what the schedules are like for the other people in the space and work around them. Might just be that you would have to go early in the morning to print/cut things out.
- Laser cutting and 3d printer time (absolute times)
- Yep, can't speed up these machines. They're so stubborn. :P
- Organization
- I had anticipated a lot of CAD parts, so I made my own little naming scheme to keep my files organized. This saved me a LOT of time during the lasercutting and assembly period.
For any beginner builders out there, there are plenty of Instructables and blogs on the internet that give helpful references and tutorials! I started out doing little things as well, but this jump of a project difficulty was fun and challenging in its own way as well, especially since I was designing the entire inner mechanism myself. Looking forward to working on it more, now that this version has 'debuted'!
~~~~~
-
II
-
And now! Let me recount to you my journey surrounding Anime Boston weekend.
The weeks leading up to the con, I was sick, exhausted, stressed. Then the week of, I pulled 3 all-nighters to try and finish the scythe. That said - NEVER doing that again. I pushed myself too hard, and I managed to get Charles sick as well. :(
Neither of us could make the Friday con and on early Saturday morning, both Charles and I (still riding on a cold) woke up super sick - cold chills, super exhaustion, fever, the whole package. I was planning to go work on the scythe some more that morning but I ultimately passed out back on the bed again. We awoke later feeling a little better but had already missed the morning con hours. We headed over to the shop to see what we could get done - but not even an hour into it, Charles's sickness got worse so he resigned to sleep on the couch. I glued the things left in place and chose to not take the smaller parts that I knew would just impede the scythe and the con experience (if I had to just keep picking up those pieces). Even when I wasn't sick, carrying the ~22.5lbs (we weighed it afterwards) of MDF and metal is tiring, so I knew I wouldn't be able to stay long at the con anyways before I would be wiped out. When I first tried to set the scythe down and deploy it, I heard something snap and distinctly remember my heart sinking. The thing that snapped was something that was integral to the entire motion and was not made of metal - the wooden dowels. Of course.
But! I needed to make the panel that Brian, Jamo, and Nancy were at (and that Charles had originally supposed to be joining as well). So I was still persistent on leaving. James, a coworker of Charles in the same lab space, helped me out with affixing the last details before I shipped out. By this time, the panel had already started (2PM in the afternoon). James helped me flag down a cab which carried me to the convention in record time. Seriously - this cab driver knew some magic shortcuts. With all the roads blocked up, he still managed to get me across in like... what seemed like 5 minutes. It would have have taken me three times as long or more if I hadn't been in that particular taxi. Thanks man!
Once there, I hauled the thing past bag check (and was instantly stopped by someone asking if that was a unfolding scythe - to which I responded, it was and still can move but sadly is broken. :'( But I proceeded to show them how it was supposed to work, and then hauled it inside, where I found Female Blake, Male Blake and Male Weiss (all part of our group cosplay!) playing Hanafuda while waiting for me.

Intense concentration. While dealing out the cards.

Hanafuda! Summer Wars! Yah!
So after meeting up with them and hauling the thing to weapons check - I didn't bother opening it, it honestly would do more damage falling on someone's foot from its sheer weight than opening - and up the escalators, we finally arrived at the correct room for the 'High-tech cosplay' panel Brian and co. were running.
So we just barged in, all heads turned our way, and then I proceeded to haul the massive thing through the side aisle and up the stage. Then after pretty much dropping the thing on the panel table - yes I interrupted the panel (sorry guys! ><;; ) - I discarded my coat and then head-desked behind the folded up scythe. And then raised my head and proceeded to talk about it after catching a small breath.

Me unfolding it with the help of Tony Stark. Oh! I meant, Brian Chan.

After I just clunked it down, of course.

And manually extended it.
All in all, it was a good panel - besides me accidentally crashing it, haha. I did some talking, but mostly just listened and stared back at the full crowd. Awesome that all of those guys have this interest! :D I'm looking forward to seeing what everyone else will make!
Afterwards, I knew that my scythe had about a few hours or so (it ended up being less than that) of usable time before it broke completely, so I prioritized pictures with the group.

Carrying it around was effectively a two-person job.
Yes, it was large.

Group photo!

(。◝‿◜。)

Salute for the fallen Ruby.
Wait-- Guys guys! I'm not dead- I'm just looking for my contact!

YES. I FINALLY GOT TO TAKE THE PIC I WANTED TO TAKE FOR SO LONG! <3
As Ivana (coworker and Female Blake) put it-
"Fallen Ruby betrayed by alternate genderbent RWBY universe"

(。◝‿◜。)
It was really windy outside.

Like, really windy.
Thanks Ivana for the gifs!

Ruby with M!Weiss and M!Blake.

Caught in the wind while putting it back together.

Again, it was really windy.
On Sunday, Charles was feeling a little better so we decided to go together that day. I wasn't going to carry the hulking piece of MDF and metal on Sunday so I spent Saturday night quickly vectorizing an existing reference pic of the scythe I had found online and used the lasercutter Sunday morning before we left to cut out little scythes for us to carry (18in in length).

Lasercut little scythes!

They were kind of cute, hehe. We made 'pew pew' noises and shook them at each other at the con.

F!Ruby and M!Ruby~
(。◝‿◜。)

There were a lot of Frozen cosplays this year.
So many pretty Anna's and Elsa's~

Brian in his epic Iron Man suit!!!
There was this super cute moment when a woman approached Brian in his suit and asked to take a picture of him. Behind her emerged a shy little boy (5 years or so?), and when he saw the Iron Man suit, his eyes grew so wide and his mouth comically gaped open! Being shy though, he took a few steps towards Brian (who had held up a low hand as if to high five the kid) and then ran back to his mom. But a few seconds later, he'd emerge and try again. This went on for a few times before he finally just ran up and then touched Brian's palm, then ran back to his mom. The entire group that formed around Brian at this point was just "aww"-ing and taking pictures and documenting this whole moment. The kid finally went up and hugged Brian around his calves before he left, eyes still wide with a happy expression. We pretty much agreed that Brian changed that little boy's life forever right then and there.

The plushies were backpacked around in our hoods.
All in all, this was a good convention. A lot of ups and downs, but in the end, I got to spend some quality fun time with friends and leveled up in my build prowess. Definitely worth all the time spent on RWBY scythe. :)
But wait! The story doesn't end here! Onwards to the next build!
yay cynthia!
ReplyDeleteWow. Impressed I'm made. Props for showing how you built the prop. RWBY is an excellent anime. Looking forward to see how you make your next version.
ReplyDelete-J
Wow, you went all out on this one; glad to see you finally complete it. :) Props can be fairly ambitious at times, and when getting this technical on one, it certainly can drain your soul. I plan on going to Otakon cosplaying as Shiroe from Log Horizon this summer. Will you guys be attending this year?
ReplyDelete