Tuesday, November 26, 2013

RWBY SCYTHE PROTOTYPE PART 1

A year ago, I saw the trailer for RWBY, fell in love, and vowed to make a working, movable scythe. One year later, after months of not working on this, and going back between idea after idea of how to start and what to do, consulting with friends, getting cold and hot feet and becoming busy with work and life in general, I finally got around to starting!

Hurrah!

I just wanted to update on what I've made so far, and where everything is headed in the next few weeks/months. Keep in mind this is all still in the prototyping stage (as you'll read), and there's still a bit of figuring out all the various mechanisms that needs to happen. It's getting exciting though! :D

Messy workspace omg!

Here's what I've done so far:


Here's a video of the blade sprung extension in action:

(Excuse my giggle at the very end.)

Eventually, the blade actions will be triggered from one motion, biased to open. And as of right now, I still have yet to figure out a closing mechanism I like, so that'll be manual until version 2+. Plus, all the prototyping material will be replaced with nicer cut metal/wood/other, and there will be the right sized bolts and nuts, etc etc etc. But the ball has been tipped over the hill now, and it won't stop rolling, hehe- :D

CLICK BELOW TO READ ON!

Sunday, November 3, 2013

ROUGH ANIMATION + PAINTING DRAPERY

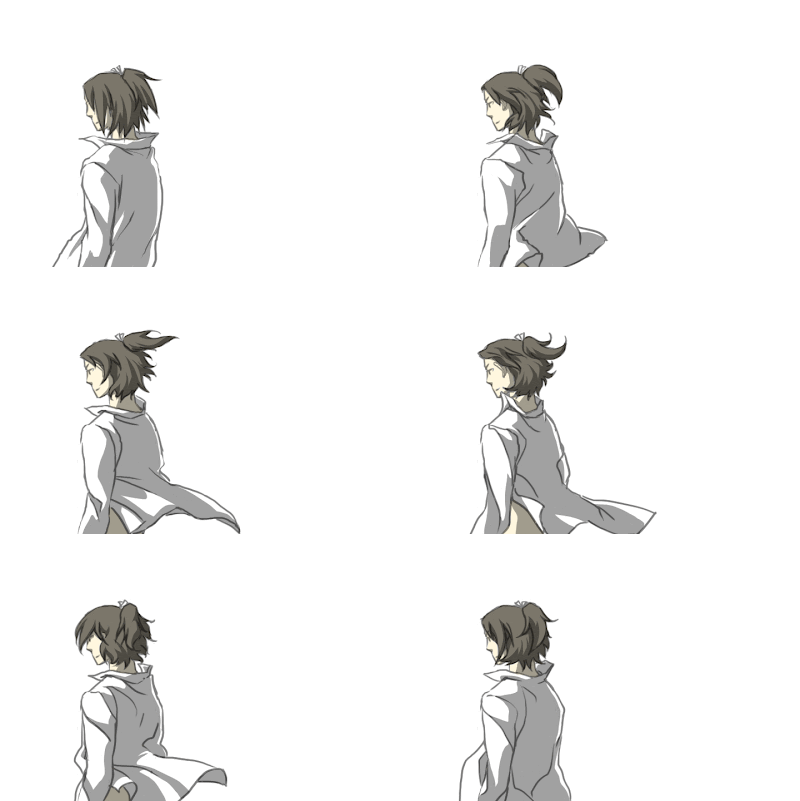
Just a quick update on some arts! I had done a rough animation yesterday just to take my mind off things. Nothing fancy, just an original character of mine getting wind-blown. I'm going to be trying out more animations in the future - it was rather relaxing, working on it, and I definitely learned a few lessons from it.


The following piece below came about from a desire to practice digitally painting drapery. Though most of the piece was spent focusing on her coloring, I actually spent an inordinate amount of time trying to fix her slanted anatomy and legs. After enough time though, I called it, and just went on to finish painting, haha. Next time, I'll work on anatomy more!


I didn't manage to capture all the WIPs, but click "Read more" to see some of the early work in progress shots!


MT WASHINGTON + D*C 2013

Around mid-September, I attended the Mt Washington Auto Road Alternative Energy Summit with Charles [etotheipiplusone] and friends, along with the MIT EV team. It was a gathering of mostly electric vehicles, ranging from home-grown motorcycles to commercial Model S's and Volts and Leafs, with a smattering or others, including steam and solar. A really cool bunch of people, a beautiful two days of nature, and lots of electric vehicles - Awesome! 

Above: The parking lot at the top of the AutoRoad.
There were a lot more motorcyclists than are shown here at the summit that day!

Above: View from the bottom camp grounds.

I took some panaromic shots, to try out the "Automate - Photomerge" feature in Photoshop - It's a pretty nifty tool!

Above: Panoramic view of the Summit grounds at the Mt. Washington AutoRoad.

Above: Panoramic view of the view on the road halfway up the mountains.

Warning: PICTURE HEAVY POST!
Click below to read more about my adventures at Mt Washington and Dragon*Con 2013!

Sunday, June 2, 2013

CELTY + ANIME BOSTON 2013

At Anime Boston this year (2013), I cosplayed as the character Celty Sturluson, the modern take on a Dullahan from the anime "Durarara!!" (exclamations points included). Boy was this an adventure, from decision to materials to construction and then to actual physical cosplay. Let me break this down - what I did, what I would do next time, how it all went, etc. And hopefully, my documented experiences here would help inspire any future Celty cosplayers!

In truth, this isn't so much an instruction blog for how to make a Celty helmet and scythe, but more of a trial and error log, tips and advice column, and experimentation report from an amateur cosplayer. But I digress-

LET'S START!


WARNING: This is a VERY LONG and PHOTO HEAVY POST! Read on after the break!

TL;DR points:
  • Start early! If you decide to make your own helmet and scythe, make sure you have the materials well ahead of time!
  • Plan ahead! Working with Bondo requires an extraordinarily and painstakingly tedious amount of sanding, and any sort of paintwork needs time to dry!
  • Have plenty of sleep and rest! It was interesting to note that most of my freehanding work did come in the late hours of the night and while they still managed to come out quite well, I do NOT recommend this method to others. Sleep is important, especially when working with tools and details!


(Read on!)

Friday, March 22, 2013

M'LADY

Quick sketch post of another mechanical lady done in pencil - mouse-over for color!

Above: M(echanical)'Lady

Monday, March 18, 2013

ROSES, SHAVINGS, AND CURLS

I thought I would continue my rose-theme from last Valentine's Day, which was a fruit and veggie salad made from tomato and strawberry roses (post found here: [Valentine Roses]), and make something rose-themed for this year's Valentine's Day as well.

The idea for this year - a rose made with wood shavings. I, with the help of Charles and some other MITERS people (Bailey, Heidi, Steve), shaved off curly wood shavings from a piece of wood, which I arranged into rose-like shapes. This was my first experience using the shaving-wood-tool, and it turned out to be really fun! A bit late in the making (though the idea was formulated a few days before V-day), but here it is. Happy super-belated Valentine's Day!

Above: Roses made from wood shavings!

Above: Man strength! Thanks for the help, guys!

Above: From this...

Above: ...to this!
(Closer shot of the big rose)

Above: The rose-arrangement with Spray-on Adhesive.
Looks like snow!

Thursday, February 28, 2013

ARTSING UPDATE

I've been commissioned for a few projects lately but I haven't been updating much on any of them, sadly. But when things start rolling out with them, I'll blog more about them here! In the meantime though, here are a few practice sketches I'd made sometime in the past month!


Above: Duck ship!
Air-based, but mobile in water too- I'm thinking
possibly used for cargo or construction...


Above: More animal-inspired designs!
Scout ships, and a floating island of rock and water..


Above: Character designs for a rodent-based species.
Skilled in scavenging and metallurgy, they built a culture dependent
on craftsmanship and trade. Though their small form is undermined by many,
they hold their own in battles and political alliances.


Above: A Persona design, based on the Shishi (Chinese Guardian Lions)
(This was for a comic)


Above: (Top) Color practice using a photo ref. (Bottom) Photo ref of a cosplayer.
(No color-picking involved!)

I've been trying to expand my portfolio, so I'll be posting some more WIPs and practice sketches on my blog and tumblr.

Thursday, February 21, 2013

ARDUINO MUSIC GLOVE + MOTORAMA 2013

In the fall 2012 semester, I was part of a Media Lab (MAS) class that introduced Electronic Musical Interfaces. We went over a wide array of controllers and instruments - from sticks to handhelds to clothing to classical instruments to mixed and new breeds, using light, circuit noise, physical objects. As a final project for the class, we had to make a working musical controller, for which I decided to utilize the Arduino.

Above: Left glove to the left, and right glove to the right.
And yes, those are purple surgical gloves.

Above: Looks like I'm about to do some surgery!

Additionally! In February, just this past weekend (2/16-17), I attended the Motorama 2013 event in Harrodsburg, PA, for the sole purpose of Robot Conflicts - a Robot competition held there. I road-tripped down with 4 other guys, 3 of whom brought robots to compete. From what I've gathered, Motorama was a showcase of pimped out dirt bikes, go karts, and other wheeled vehicles that race for some prizes. It worked like a convention + fair + vehicle show, with tents of sponsored racers, 100+ vendors, a really really big carnival-style food court, and other such rooms and events. I only stuck around the Robot arena, so I didn't fully experience the event, but I didn't mind- The robot event alone was awesome enough!

Above: Charles, Dane, and Adam working on last minute adjustments on their robots.

Above: View of the audience from behind the robot combat stage.
There's another stand on the other side of the stage, but this side was always more populated.

Above: One of the highlights of my robot weekend - Charles' robot "Uberclocker Advance"
picking up other robots to bash against other robots.

Read more by clicking the link below!